Prerequisite requirement
- Installed and configured Maven, MySQL, Eclipse IDE.
- See more at: http://www.developer.am/documentation/hibernate/?page=maven-spring-hibernate-mysql-example#sthash.8UVHMaBr.dpufPrerequisite requirement
- Installed and configured Maven, MySQL, Eclipse IDE.
- See more at: http://www.developer.am/documentation/hibernate/?page=maven-spring-hibernate-mysql-example#sthash.8UVHMaBr.dpufPrerequisite requirement - Installed and configured Maven, MySQL, Eclipse IDE.
- See more at: http://www.developer.am/documentation/hibernate/?page=maven-spring-hibernate-mysql-example#sthash.8UVHMaBr.dpu
Prerequisite requirement
- Installed and configured Maven, MySQL, Eclipse IDE.
- See more at: http://www.developer.am/documentation/hibernate/?page=maven-spring-hibernate-mysql-example#sthash.8UVHMaBr.Step1: Create a Java project with Maven
Run the following command in terminal or command prompt to generate a standard java project.
Create a quick project file structure with Maven command ‘mvn archetype:generate‘ - See more at: http://www.developer.am/documentation/hibernate/?page=maven-spring-hibernate-mysql-example#sthash.8UVHMaBr.dpuf
[ranga@ranga gradle]$
mvn archetype:generate -DgroupId=com.ranga -DartifactId=HibernateExampleUsingPostgreSQL -DarchetypeArtifactId=maven-archetype-quickstart -DinteractiveMode=falseProject structure:HibernateExampleUsingPostgreSQL/├── pom.xml
└── src
├── main
│ └── java
│ └── com
│ └── ranga
│ └── App.java
└── test
└── java
└── com
└── ranga
└── AppTest.java
9 directories, 3 files
Step2: Compile and Run the newly created Java project.
[ranga@ranga HibernateExampleUsingPostgreSQL]$
mvn clean install [ranga@ranga HibernateExampleUsingPostgreSQL]$
java -cp target/HibernateExampleUsingPostgreSQL-1.0-SNAPSHOT.jar com.ranga.AppOutput: Hello World!
Step3: Convert to Eclipse Project
[ranga@ranga HibernateExampleUsingPostgreSQL]$ mvn eclipse:eclipse
Step4: Import converted Project into Eclipse
OpenEclipse IDE, Choose File –> Import –> General folder, Existing Projects into Workspace –>Choose your project folder location.
Step5: Add the Hibernate4.x and Oracle dependencies
pom.xml<project xmlns="http://maven.apache.org/POM/4.0.0" xmlns:xsi="http://www.w3.org/2001/XMLSchema-instance"
xsi:schemaLocation="http://maven.apache.org/POM/4.0.0 http://maven.apache.org/xsd/maven-4.0.0.xsd">
<modelVersion>4.0.0</modelVersion>
<groupId>com.ranga</groupId>
<artifactId>HibernateExampleUsingPostgreSQL</artifactId>
<version>0.0.1-SNAPSHOT</version>
<packaging>jar</packaging>
<name>HibernateExampleUsingPostgreSQL</name>
<url>http://maven.apache.org</url>
<properties>
<project.build.sourceEncoding>UTF-8</project.build.sourceEncoding>
</properties>
<!-- JBoss repository for Hibernate -->
<repositories>
<repository>
<id>JBoss repository</id>
<url>http://repository.jboss.org/nexus/content/groups/public/</url>
</repository>
</repositories>
<dependencies>
<dependency>
<groupId>junit</groupId>
<artifactId>junit</artifactId>
<version>4.8.2</version>
<scope>test</scope>
</dependency>
<!-- Hibernate framework -->
<dependency>
<groupId>org.hibernate</groupId>
<artifactId>hibernate-core</artifactId>
<version>4.2.7.Final</version>
</dependency>
<dependency>
<groupId>javassist</groupId>
<artifactId>javassist</artifactId>
<version>3.12.1.GA</version>
</dependency>
<dependency>
<groupId>postgresql</groupId>
<artifactId>postgresql</artifactId>
<version>9.1-901.jdbc4</version>
</dependency> </dependencies>
</project>
Step6: Create a resources folder
Create a new folder called
resources under
src/main. Here we are adding the Configuration files and Mapping files.
Project structure:HibernateExampleUsingPostgreSQL/├── pom.xml
└── src
├── main
│ ├── java
│ │ └── com
│ │ └── ranga
│ │ └── App.java
│ └── resources
├── pom.xml
└── test
└── java
└── com
└── ranga
└── AppTest.java
10 directories, 6 files
Step7: Hibernate configuration file
Create a Hibernate configuration file and put under the resources root folder, “src/main/resources/hibernate.cfg.xml“. Add the following content.
hibernate.cfg.xml<?xml version="1.0" encoding="utf-8"?>
<!DOCTYPE hibernate-configuration PUBLIC
"-//Hibernate/Hibernate Configuration DTD 3.0//EN"
"http://hibernate.sourceforge.net/hibernate-configuration-3.0.dtd">
<hibernate-configuration>
<session-factory>
<!-- Database connection settings -->
<property name="
connection.driver_class">
org.postgresql.Driver</property>
<property name="
connection.url">
jdbc:postgresql://127.0.0.1:5432/RangaDB</property>
<property name="
connection.username">
ranga</property>
<property name="
connection.password">
ranga</property>
<!-- JDBC connection pool (use the built-in) -->
<property name="connection.pool_size">1</property>
<!-- SQL dialect -->
<property name="
dialect">
org.hibernate.dialect.PostgreSQLDialect</property>
<!-- Enable Hibernate's automatic session context management -->
<property name="current_session_context_class">thread</property>
<!-- Disable the second-level cache -->
<property name="cache.provider_class">org.hibernate.cache.internal.NoCacheProvider</property>
<!-- Echo all executed SQL to stdout -->
<property name="show_sql">true</property>
<!-- Drop and re-create the database schema on startup -->
<property name="hbm2ddl.auto">create</property>
<mapping resource="com/ranga/mapping/Person.hbm.xml" />
</session-factory>
</hibernate-configuration>
Step8: Hibernate Mapping fileCreate a Person.hbm.xml file and put it in “src/main/resources/com/ranga/mapping“ folder.
Person.hbm.xml<?xml version="1.0"?>
<!DOCTYPE hibernate-mapping PUBLIC
"-//Hibernate/Hibernate Mapping DTD 3.0//EN"
"http://www.hibernate.org/dtd/hibernate-mapping-3.0.dtd">
<hibernate-mapping package="com.ranga.mapping">
<class name="Person" table="Persons">
<id name="id" column="Person_ID" type="long">
<generator class="native"/>
</id>
<property name="firstName" column="FirstName" type="string"/>
<property name="lastName" column="LastName" type="string"/>
<property name="age" column="Age" type="integer"/>
</class>
</hibernate-mapping>
Project structure: HibernateExampleUsingPostgreSQL/
├── pom.xml
└── src
├── main
│ ├── java
│ │ └── com
│ │ └── ranga
│ │ └── App.java
│ └── resources
│ ├── com
│ │ └── ranga
│ │ └── mapping
│ │ └── Person.hbm.xml
│ └── hibernate.cfg.xml
├── pom.xml
└── test
└── java
└── com
└── ranga
└── AppTest.java
13 directories, 8 files
Step9: POJO class or Model classCreate a Person.java file and put it in “
src/main/java/com/ranga/mapping”
Person.java
package com.ranga.mapping;
import java.io.Serializable;
public class
Person implements Serializable {
private long id;
private String firstName;
private String lastName;
private int age;
public long getId() {
return id;
}
public void setId(long id) {
this.id = id;
}
public String getFirstName() {
return firstName;
}
public void setFirstName(String firstName) {
this.firstName = firstName;
}
public String getLastName() {
return lastName;
}
public void setLastName(String lastName) {
this.lastName = lastName;
}
public int getAge() {
return age;
}
public void setAge(int age) {
this.age = age;
}
@Override
public String toString() {
return "Person [id=" + id + ", firstName=" + firstName + ", lastName="
+ lastName + ", age=" + age + "]";
}
}
Step10: Hibernate Utility classCreate a HibernateUtil.java class to take care of Hibernate start up and retrieve the session easily. Create a util folder and put this file in it, “
src/main/java/com/ranga/util”.
HibernateUtil.java
package com.ranga.util;
import org.hibernate.SessionFactory;
import org.hibernate.cfg.Configuration;
import org.hibernate.service.ServiceRegistry;
import org.hibernate.service.ServiceRegistryBuilder;
public class HibernateUtil {
private static final SessionFactory sessionFactory;
private static final ServiceRegistry serviceRegistry;
static {
try {
// Create the SessionFactory from hibernate.cfg.xml
Configuration configuration = new Configuration();
configuration.configure();
serviceRegistry = new ServiceRegistryBuilder().applySettings(
configuration.getProperties()).buildServiceRegistry();
sessionFactory = configuration.buildSessionFactory(serviceRegistry);
} catch (Throwable ex) {
// Make sure you log the exception, as it might be swallowed
System.err.println("Initial SessionFactory creation failed." + ex);
throw new ExceptionInInitializerError(ex);
}
}
public static SessionFactory getSessionFactory() {
return sessionFactory;
}
public static void closeSessionFactory() {
if (sessionFactory != null)
sessionFactory.close();
}
}Step 11: Client ApplicationApp.java
package com.ranga;
import org.hibernate.Session;
import org.hibernate.SessionFactory;
import com.ranga.mapping.Person;
import com.ranga.util.HibernateUtil;
public class
App {
public static void main(String[] args) {
SessionFactory sessionFactory = HibernateUtil.getSessionFactory();
Session session = sessionFactory.openSession();
session.beginTransaction();
Person p1 = new Person();
p1.setFirstName("ranga");
p1.setLastName("reddy");
p1.setAge(25);
long personId = (Long) session.save(p1);
session.getTransaction().commit();
Person person = (Person) session.get(Person.class, personId);
System.out.println(person);
session.close();
}
}
Project structure:HibernateExampleUsingPostgreSQL/
├── pom.xml
└── src
├── main
│ ├── java
│ │ └── com
│ │ └── ranga
│ │ ├── App.java
│ │ ├── mapping
│ │ │ └── Person.java
│ │ └── util
│ │ └── HibernateUtil.java
│ └── resources
│ ├── com
│ │ └── ranga
│ │ └── mapping
│ │ └── Person.hbm.xml
│ └── hibernate.cfg.xml
├── pom.xml
└── test
└── java
└── com
└── ranga
└── AppTest.java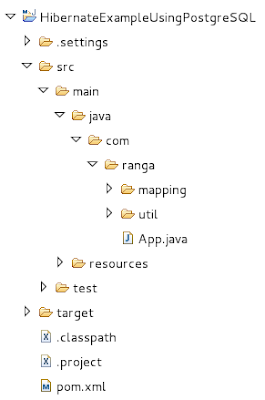
15 directories, 10 filesNow the Hibernate Application is ready.
Step12: Run the hibernate client applicationPerson [id=1, firstName=ranga, lastName=reddy, age=25]Download 


